Making A Maze
Required:
Items & Blocks.
Building A Structure In Depth.
Expressions & Generation Logic.
Structure Script Block.
Optional:
Structure Types.
An RC maze is essentially a parent structure that spawns naturally and triggers the procedural generation of its child structures. The child structures are maze pieces, called "rooms," and are what make up the maze. These can be of any defined shape and purpose, with typical examples being corridors, bends, 4 way intersection, etc. Think of them as the building blocks of your maze. A parent structure with a maze generator script block will generate naturally and then trigger a sequence of these building blocks until your maze is constructed with a path between the entry/ exits, using the rules you define in the maze generator. Rooms in a maze generator are randomly selected from the ones assigned to that maze, and are chosen based on things like weight, valid orientation, and expressions. A given room can show up multiple times in a given instance of a maze, or not at all.
What you use mazes for, and what exactly a maze can be, is entirely defined by the pack dev. While the generic maze type of twisting corridors that loop around, have dead ends, and treasurer rooms (henceforth referred to as labyrinths) is the most common use; it is certainly not the only one. The only requirements for a maze is to have a valid path through the defined exit points. Other than that, you can do literally anything you want with it. You could create typical buried dungeons, natural dungeons inside giant trees, a dynamic cave system of a monster's hive, dynamic bunkers or moon bases, or even a spaceship whose internal layout is randomized.
Your maze needs a base room size, a maze size, and a selection of two or more exits.
This is an arbitrary value. Your base room size is the dimensions, in blocks, of your default room (these are called components). All rooms in your maze must be a multiple of your component. For example, if you decide your base size is [5x,3y,5z] blocks, then your smallest room must be equal to this. Here is our hypothetical room:
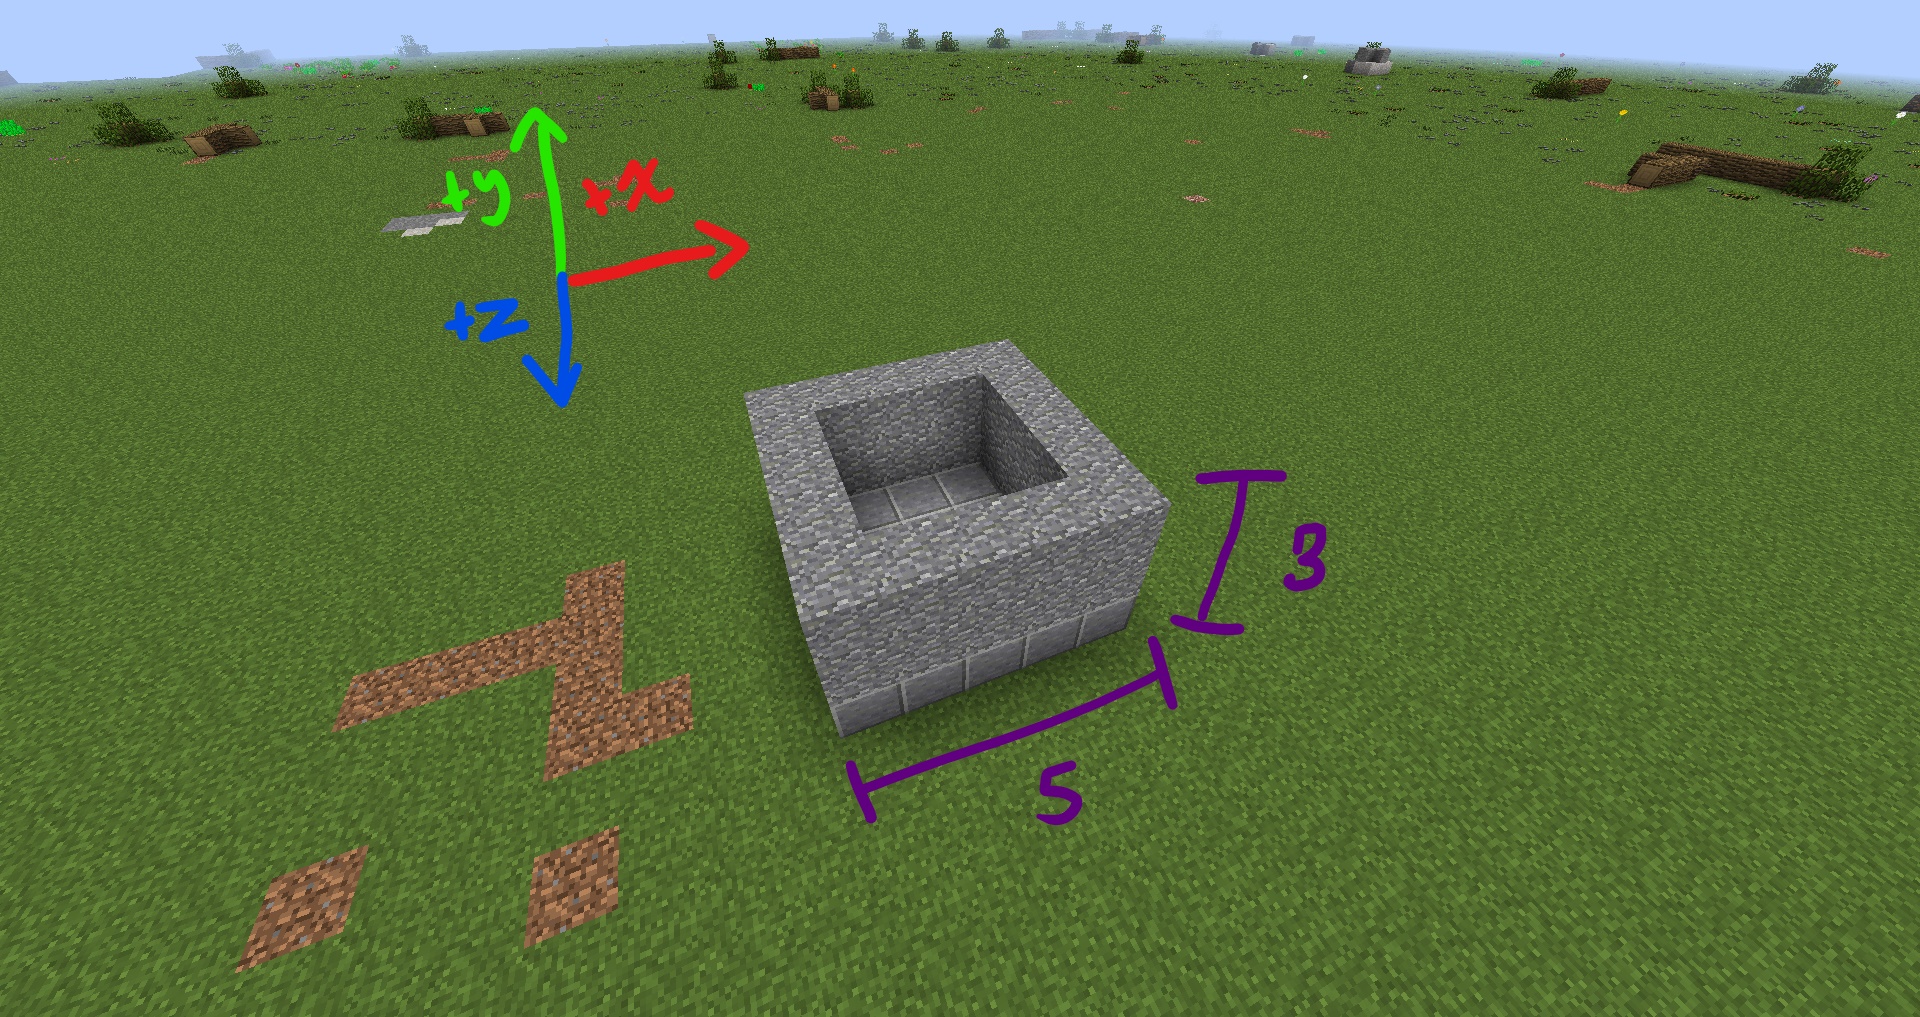
If you want to make a room that is larger, you can multiply by an integer along any axis based on your component's dimensions. E.g [10,4,5] would give your room twice the base length in the X direction. [15,3,10] would give it three times the length in the X direction and two times the length in the Z direction. Think of components as invisible boxes that comprise each room. Here, we have a room that is 3 components long in the X direction, and 0 components long in the Z direction:
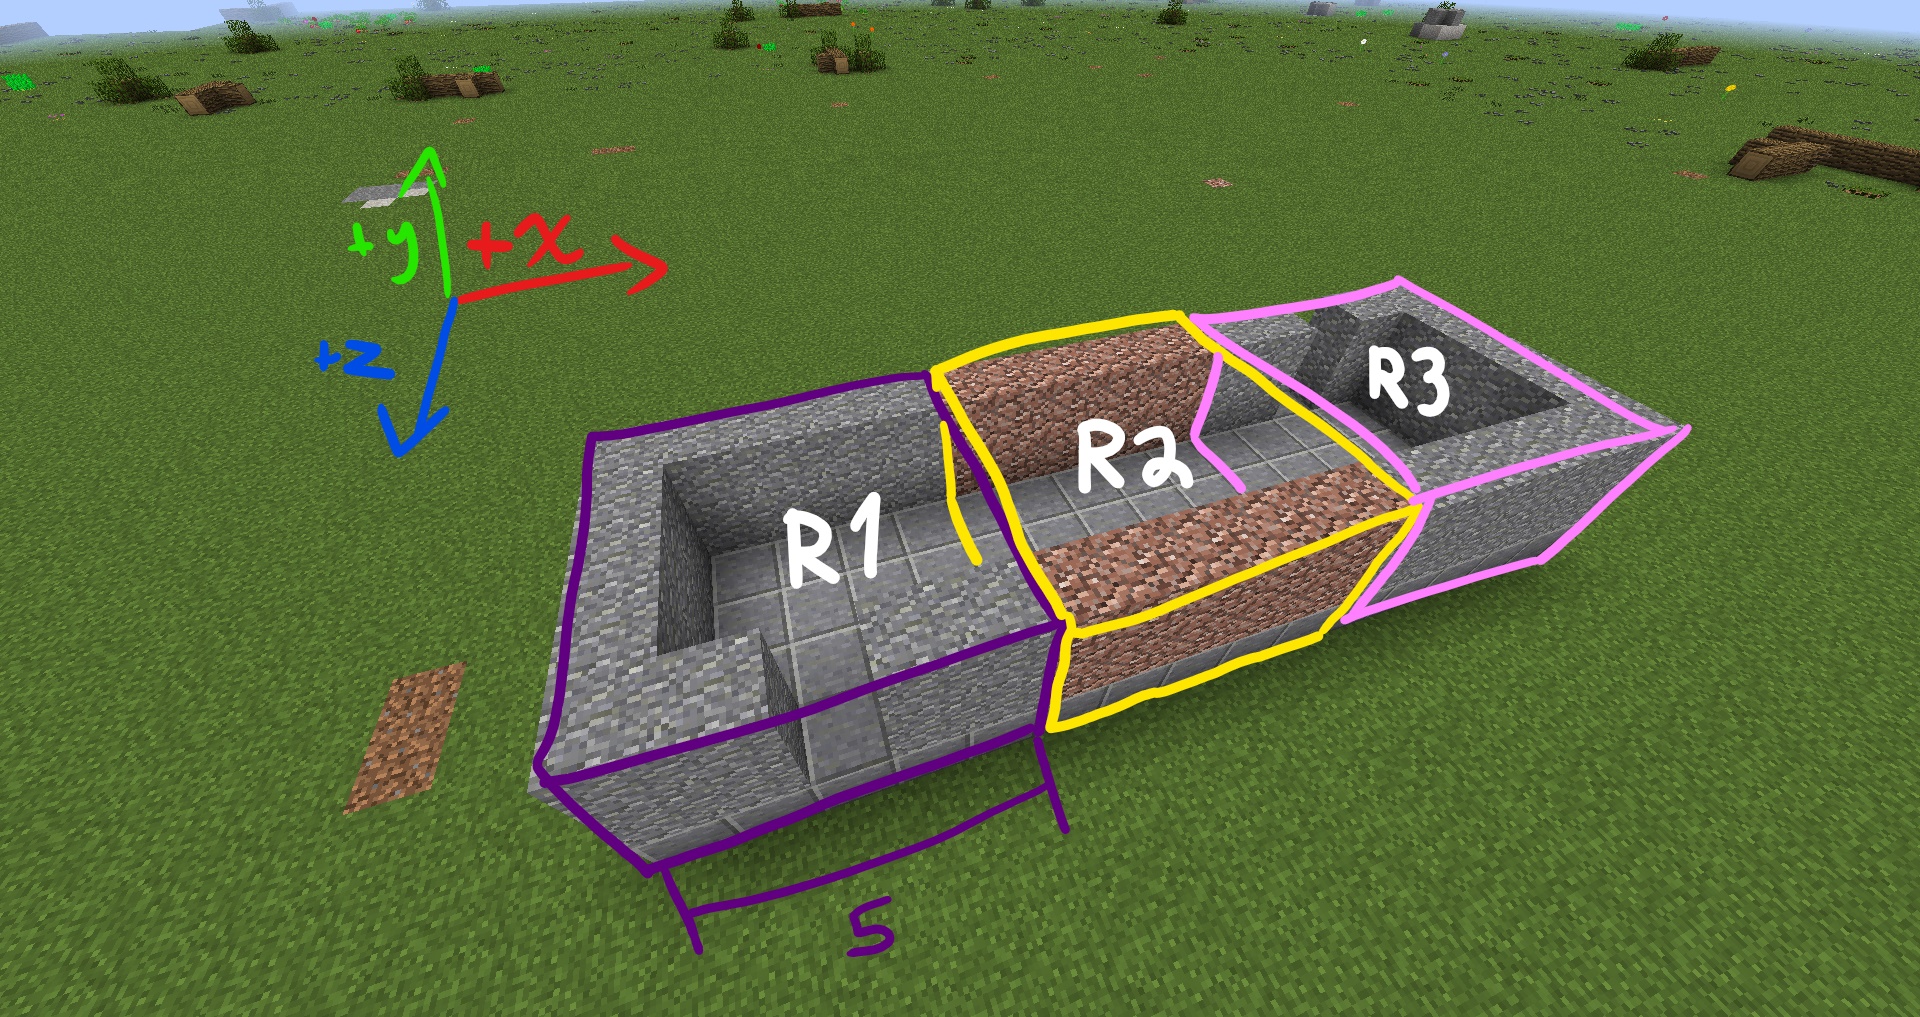
Wait what? 0 components? Yes, that's right, and this is an important distinction. Component lengths when defined in the rules of the script blocks do not use numbers that represent the number of components in your room. They use numbers that represent how many additional components on top of the default your room size is. So a component size of [0,0,0] in our example would create a room that is [5,3,5]. Our above room would have a room dimension of [2,0,0]. 2 additional components in the X, and 0 additional components in the Y and Z axis.
Here is another example with a room that has a component size of [1,0,1]:
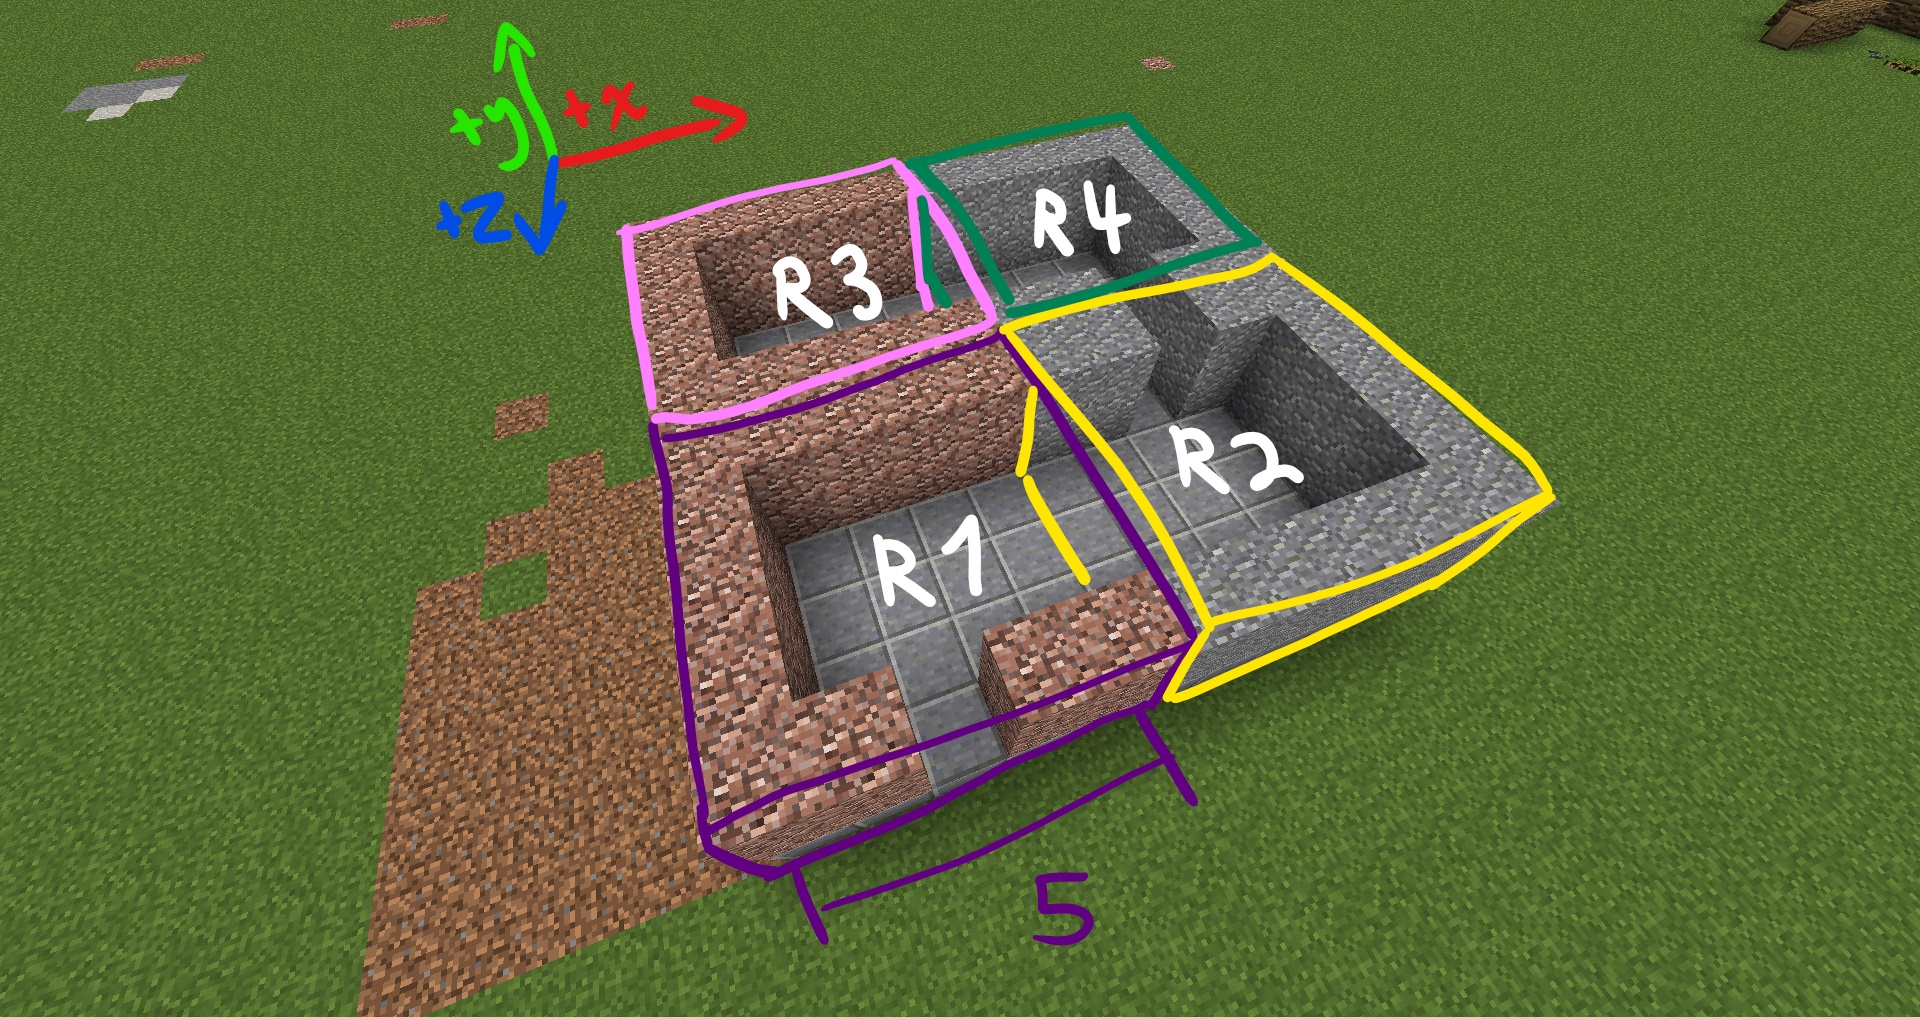
Note: the actual contents of your rooms can be whatever you want as long as it fits within the confines of your component sizes. You could even have rooms without walls if you wanted.
Now that we understand how rooms and components work, we'll cover maze size. Your maze size is the maximum allowable size, as multiples of your base component size, that the maze can be. Think of it as a grid where each square in the grid has the dimensions of your base component. So given our theoretical base room size here of [5,3,5], if you set your maze size to [10,0,10], then the size in blocks of your maze will be 50x50 (your maze can have rectangular sizes too, or even oblong or partial prisms). Your maze will be able to fit 10 components in the X axis, and 10 components in the Z axis (remember that components are not rooms. Rooms can be multiple components in size).
Rooms can be whatever size and shape you want, and will generate to fit within the maze size. If a room has an invalid orientation because of its size, it won't generate or will be replaced with a smaller room. While you can fit fancier builds within them, larger rooms means fewer individual rooms to generate within your maze, and consequently will make it less dynamic. Find the right balance of component and room size for your build.
To build your maze, you create each room as a separate structure and export it using the "Maze Component" generator type (make sure that you are selecting the correct amount of blocks! If a room is off by even one block, it can royally mess up your maze).
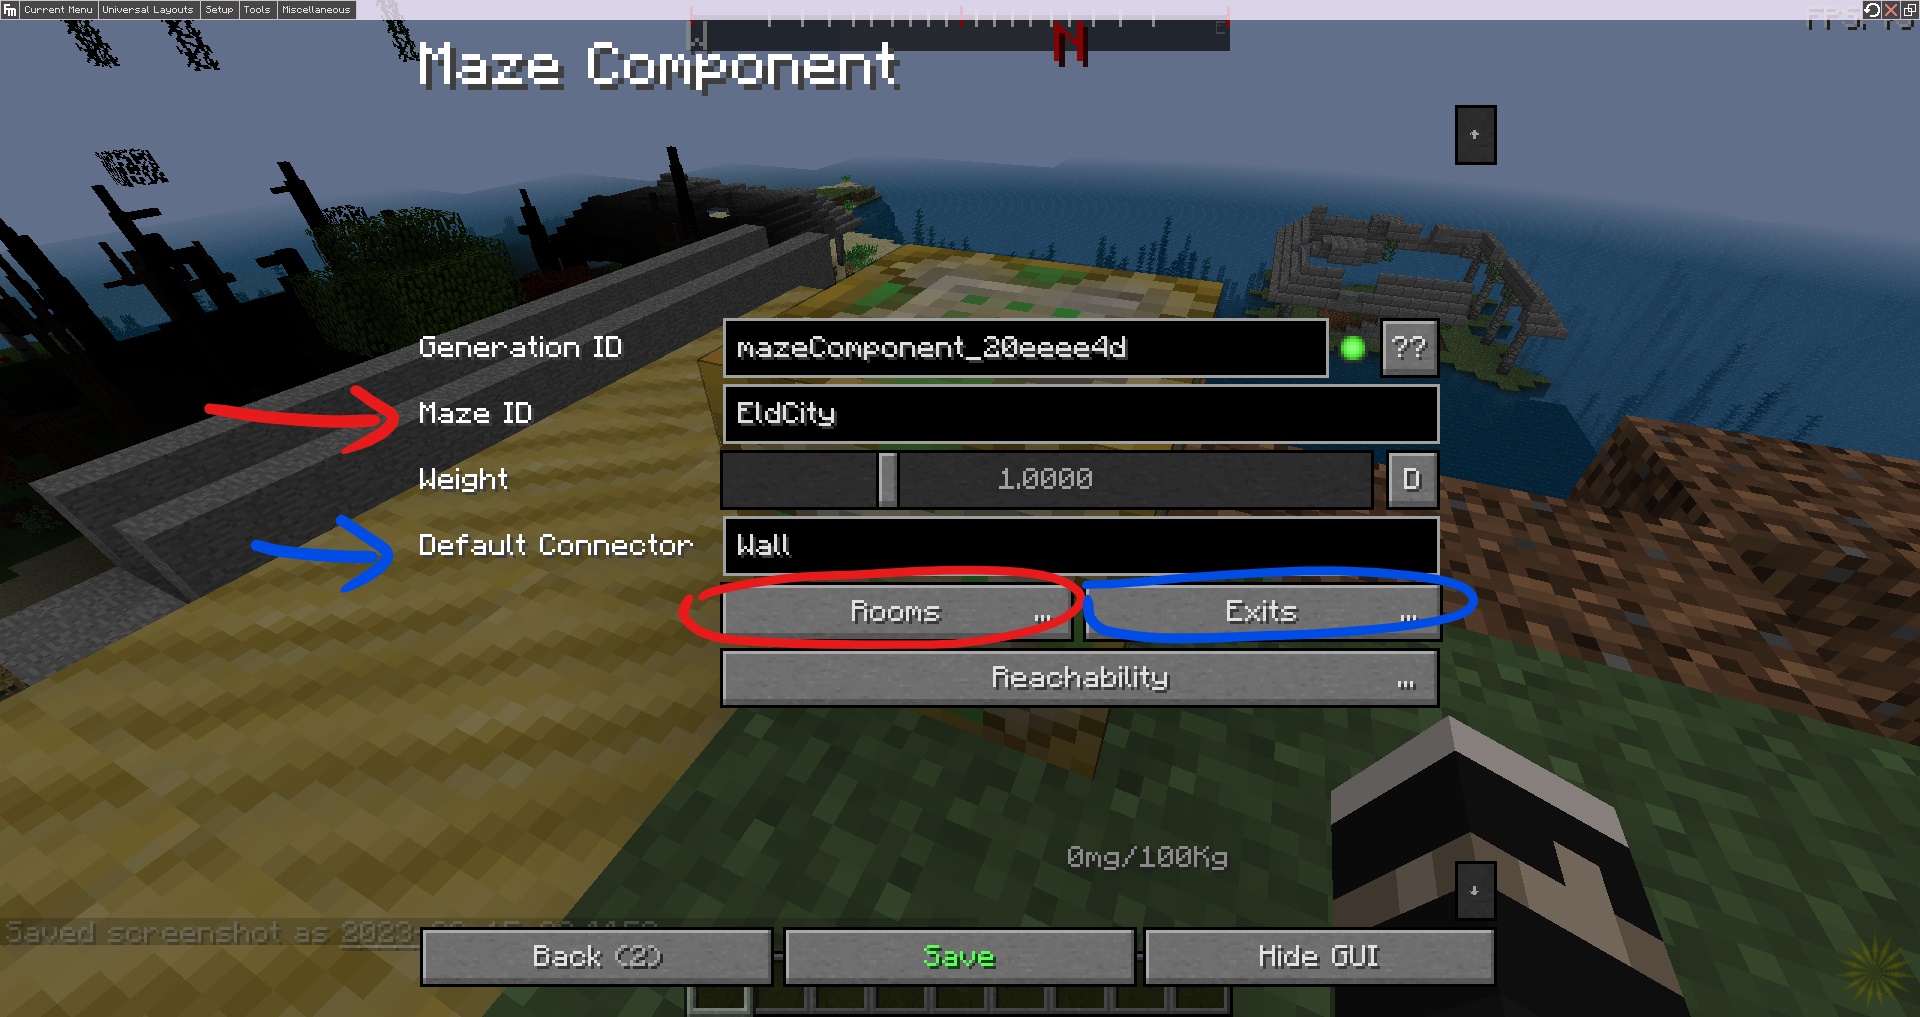
In this window you will have a several options:
- MazeID: This is the unique identifier of your maze, and needs to be the same on all of your rooms for this maze. To keep things organized, I recommend making your maze ID the same as your maze's name, e.g an ID of CorruptedDungeon and a parent structure name of CorruptedDungeonParent.
- Weight: The spawn weight this room has.
-
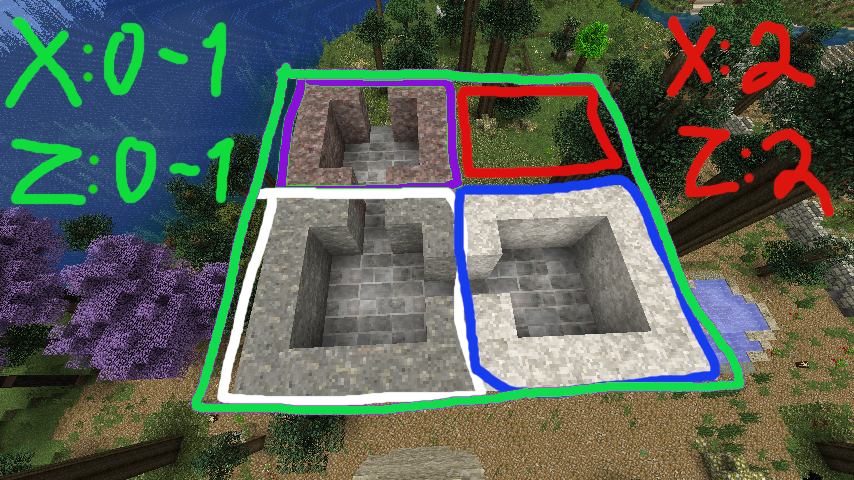
Rooms: This decides the size of the room for the structure by specifying its component multiple. You can actually define room shapes that are irregular by using multiple entries. "Additive" values will mark actual parts of the room, and "subtractive" values will mark empty space. So if you wanted to create an L shaped room with the layout as shown below, you'd specify "additive range X1 Y0 Z1" (outlined green), and then "subtractive exact X1 Y0 Z1" (move both sliders. This targets the component location in the room outlined in red. Each small coloured square shows a component size within this room. Yes the image coord is wrong, it should be 1 not 2). This works in the Y direction as well, such as tall rooms which act as stairs between levels in the maze. Note that irregular room sizes will restrict what rooms can generate next to them, so keep your designs reasonable.
 \
\ -
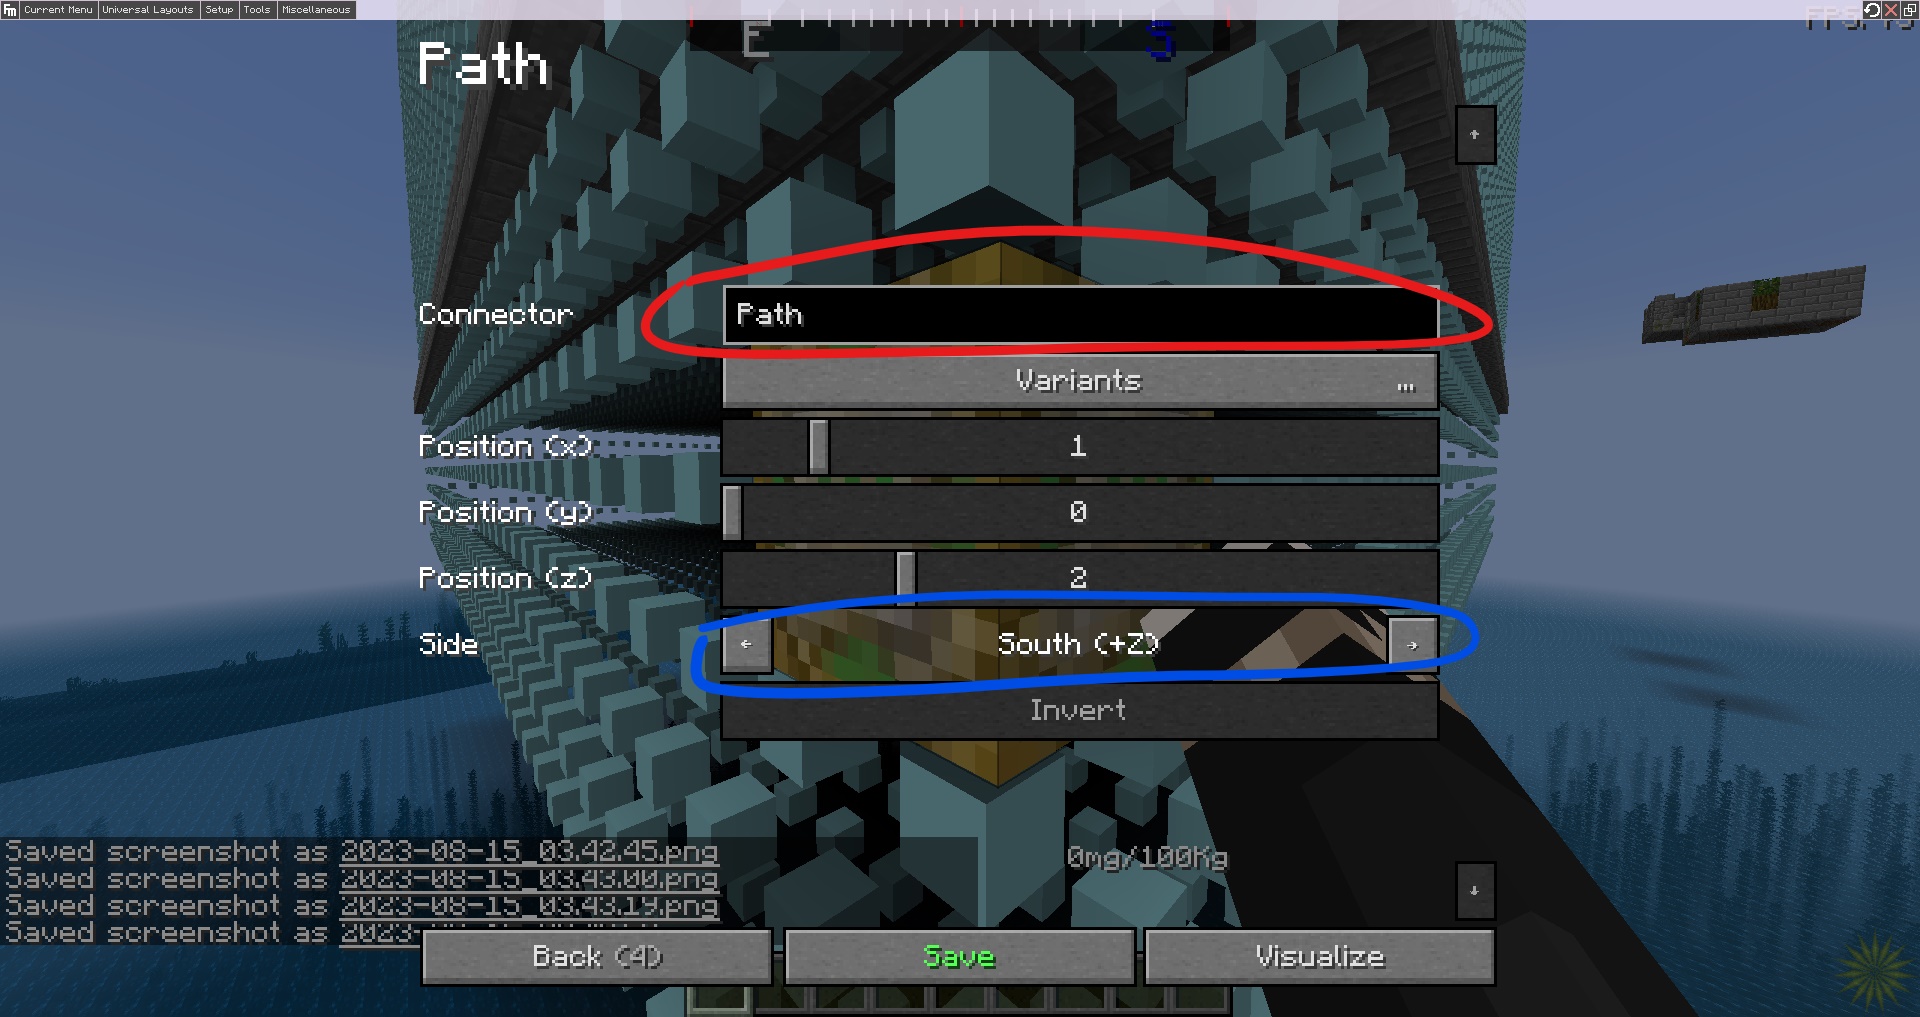
Exits: These are where the holes/ paths in the walls of a room are that let you walk between rooms. If you have a component that is base size, just add an exit for each entrance, and set the Side to wherever the exit is facing (check f3). However, if your component is bigger than the base size, then you will need to edit the Position sliders. E.g let's look at one of the previous examples:
If we treated R1-R3 as a single room, we would have one exit facing South on the left end of the room, and one facing North on the right end. If for this structure we are using a [5,3,5] component size, that would make this room [2,0,0] because we are extending beyond the base size twice in the X direction. So we would go into the Exits tab, click the plus sign twice (one for each exit), click into the menu of the first exit tab we just added, and then set the exit Face to South (for the R1 section). Then we go into the other exit tab and move the X Position slider to 1, and then set the exit Face to North (for the R3 section). Note for tall multi-floor stairway rooms, don't forget to set the Y offset of the upper floor exit. Rooms that generate will attempt to orient themselves to match their exits with the exits of nearby rooms unless you disable the "rotatable" option during export, in which case the room will only ever have on orientation. This is useful for matching up certain rooms or rooms that have modded blocks which don't support rotation, but will decrease the available positions for it as it won't generate if its exits don't match up with rooms nearby. If you have too many rooms which don't rotate, and not enough room variations to make up for it, your maze may never be able to generate a path between exits due to not having enough valid combinations.
Whatever the design of your rooms, the location of their doors/ paths will need to be predictable and consistent so that different rooms connect properly when next to each other, so you must follow a doorway pattern. E.g. putting doorways in the exact center of a room, making two doorways on a given side always inset two blocks from the edge, making sure offset doorways have connection rules defined in the scripts that specify the matching side on another component, etc. You can experiment with different methods, and there really are a lot of ways to go about it. For doorway examples, check the Examples section below.
The parent structure, as stated, is the structure that triggers the generation of a maze script block. Maze parents are the only parts of a maze that generate naturally. They are basically regular structures, but with a maze script block inside. Where you position your maze block is up to you as you can shift the start point of the maze to be anywhere you want, just remember that it will generate outwards in the positive direction. E.g if you want the maze to generate centered from the script block, you'll have to shift towards a negative offset.
Once your entrance/ parent structure is built, you'll want to set up all the rules in the script block for your maze. Note: Your parent structure can be any size and design you want so long as it doesn't cross into the maze's boundaries as it will get overwritten by rooms when they generate. Using an earlier example, if you wanted to make a spaceship with a randomized internal layout, the "shell" of the spaceship would be part of the parent structure, with the inside hollowed out to allow for the maze to generate (and the maze bounds set to be contained within it).
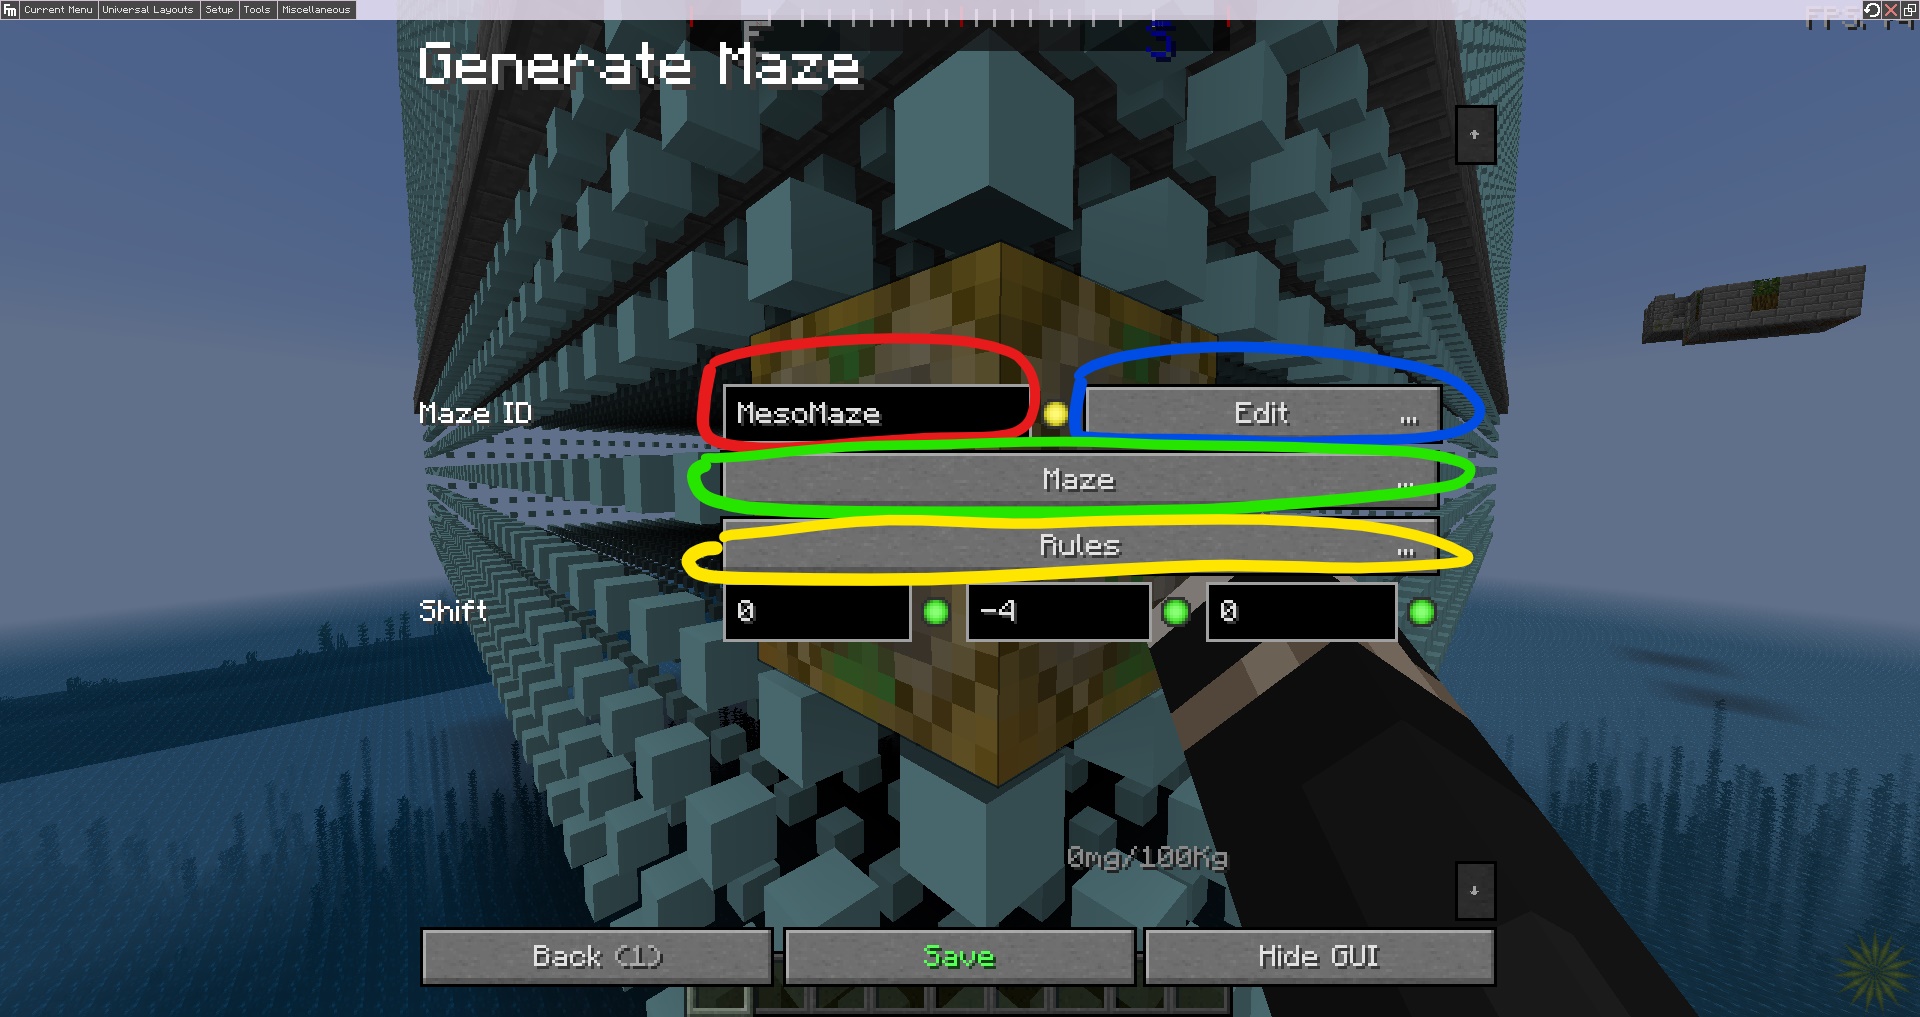
Anyway, start by setting your script block to maze generator set to activate on spawn:
 \
\
- Maze ID: This is the ID you used when creating the rooms for the maze.
- Shift: The shift of the maze's origin when generating. See above.
- Edit: This is the window where you set your component size in blocks.
-
Maze: This window has several options for defining the size of your maze grid.
Reachability is an advanced feature covered here(WIP). Rooms defines how big your maze is, in numbers of components (e.g component size of [5,3,5] and maze size of [10,0,10] makes a single-story maze 50x50 blocks across). You can have irregular maze sizes to make oblong dungeons or exclude sections within the maze's bounds if the parent structure sticks into it (e.g if your parent structure is a dungeon entrance that descends into the center of the maze, then you'd want to exclude the component coordinates in that location). it's usually easiest to define a rectangle of the maze bounds with "additive" (include the defined area), and then add a second entry to the rooms window that specifies the portion to exclude using "subtractive." Think of your maze as a grid where each square is the size of your component, and the coordinates of each square are counted outwards towards the positive axis. Here is an example of a maze grid using very large components where the parent structure is a castle wall that wraps around the outside:
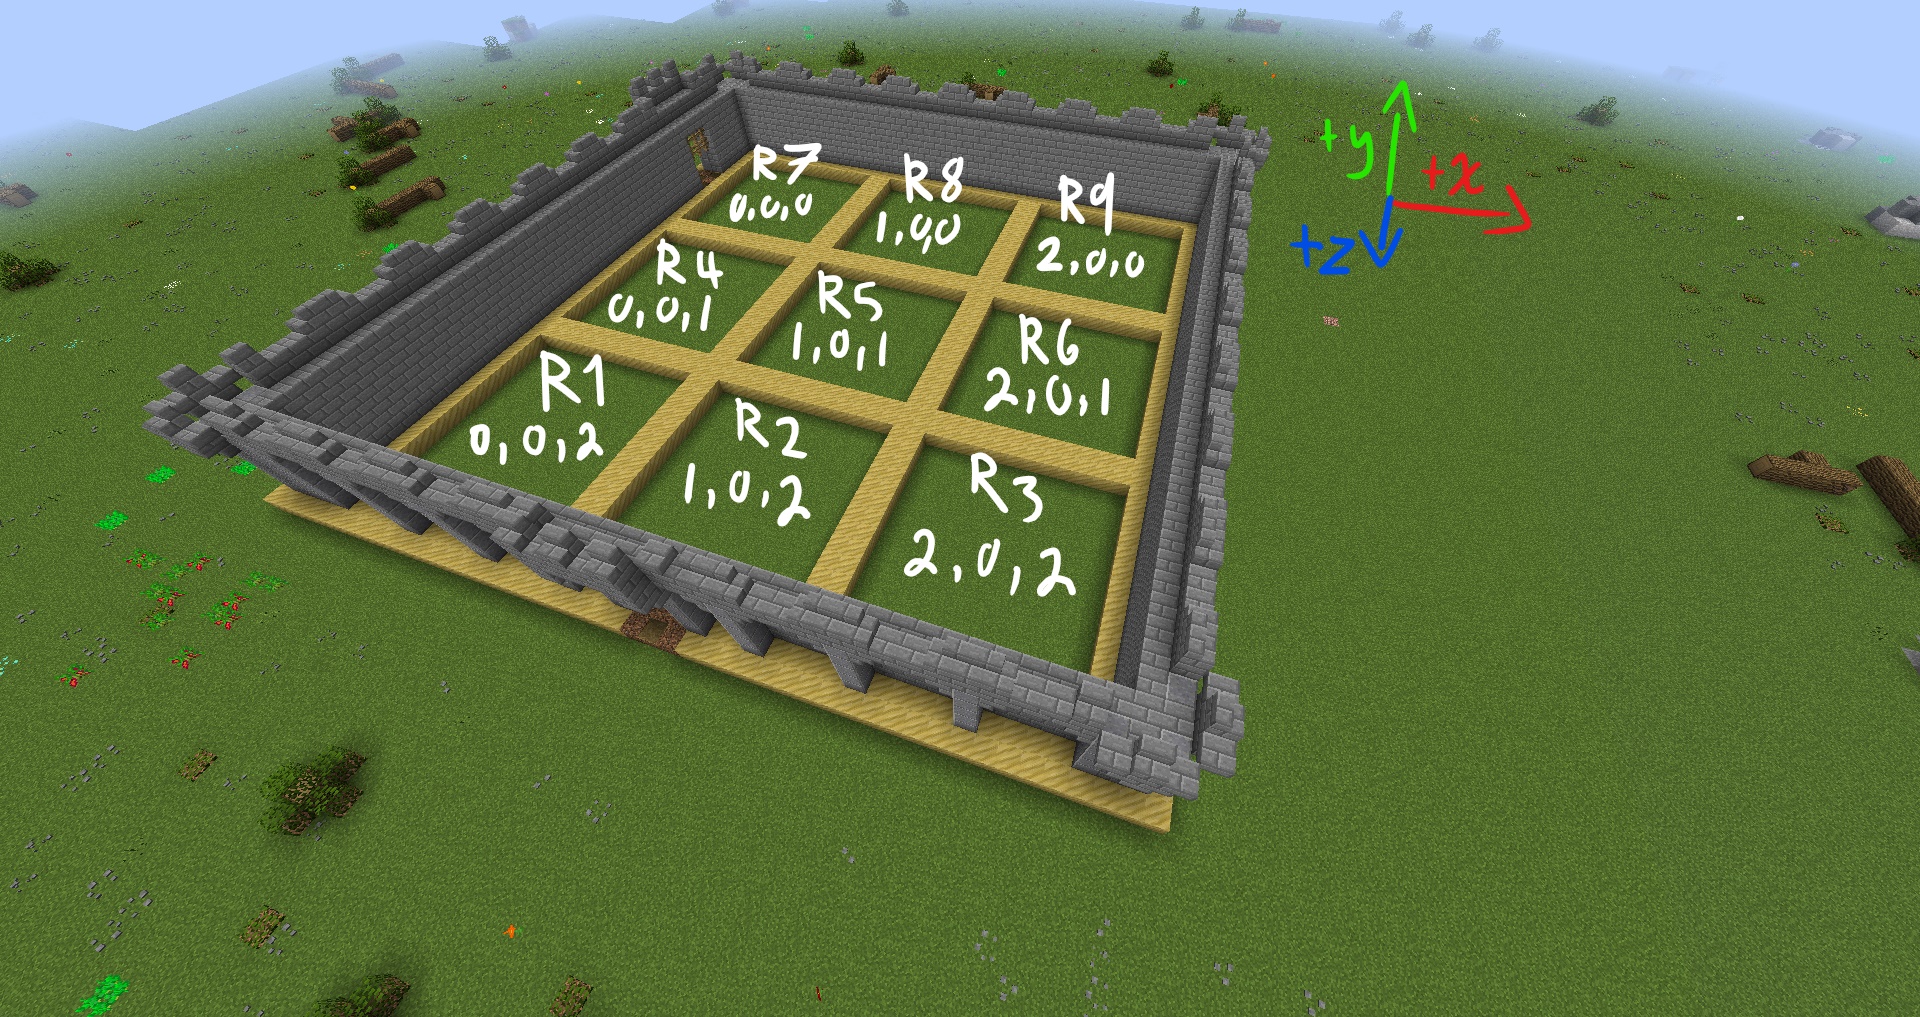 \
\
- Exits: These are the component coordinates of your exits (any entry point into your maze. There is no distinction between entry and exit points). You'll need an entry in the exits window for each exit you have. After defining the coordinates of your exits, you'll need to define the direction that exit faces (supports up, down, and the 4 cardinal directions).
-
Rules: Defines the rules for generating paths within your maze between exits. You have two options when defining exit paths: "Connect all" and "connect some." With connect all, the maze will attempt to generate a path between all entry points (useful for mazes where you aren't making a labyrinth, but more a dynamic structure that you want as filled out as possible, or if you want to connect all entrances in a labyrinth. A maze will stop generating rooms when exit paths have been connected, potentially leaving empty space you'd want filled in). Connect some will allow you to define which entrances and exits can have a path between them, which require a path between them, and which will never have a path between them. Can be used to created sections in a labyrinth only accessible through certain entrances.
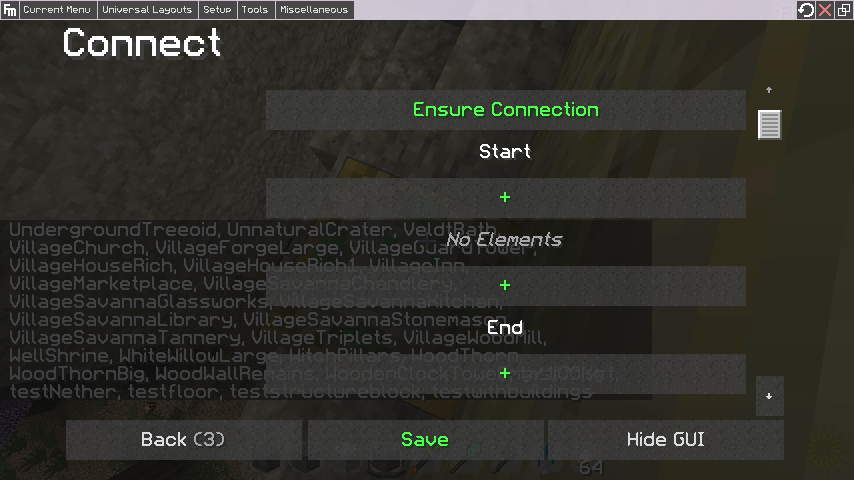 \
\
And that's it, your maze is set up.
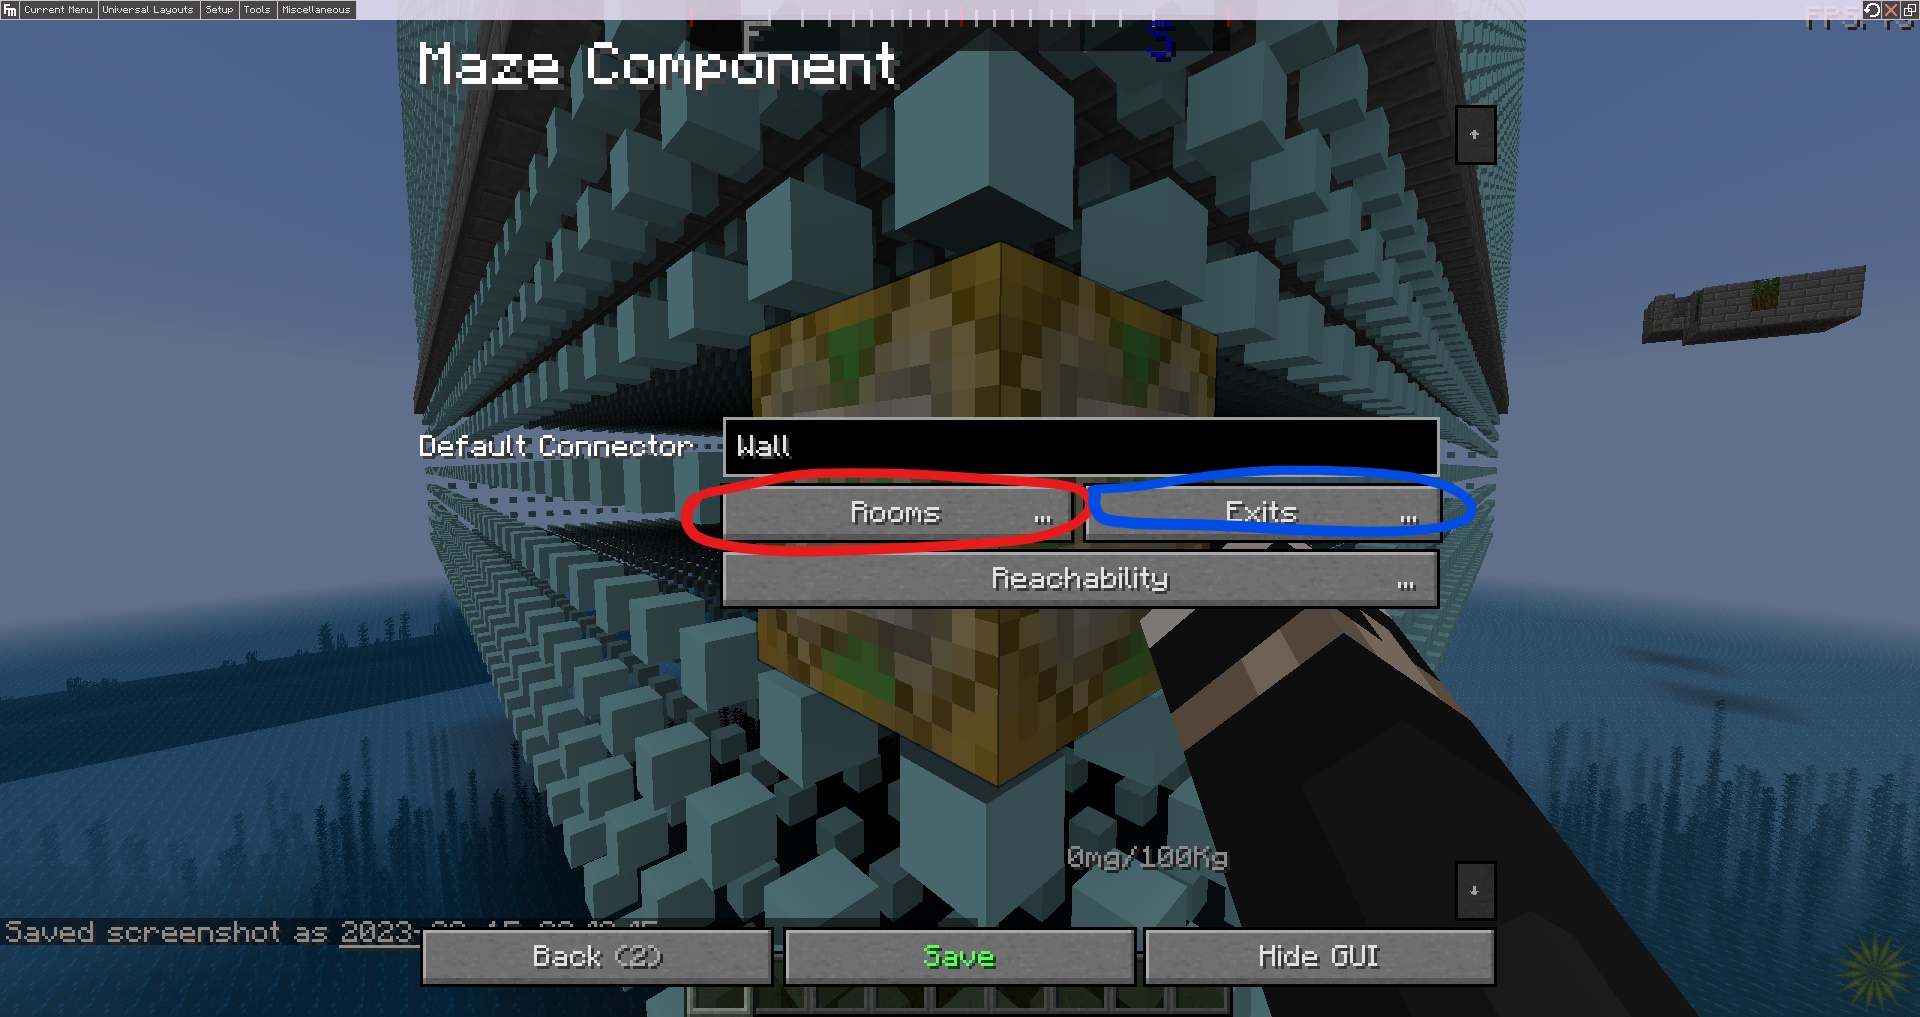
Now that we get how to make a basic maze, you might be wondering: "What if I want specific maze components to only generate next to other specific maze components? How do I have more control over my maze?" And the answer to that is: Connectors. You may have noticed all the 'connector" and "default connector" boxes in the maze script block window and the export window of maze component structures. These are additional generation logic for fine tuning which rooms are able to connect to each-other.
If you edit a maze component and look at its menu, you'll notice that the main menu has a "default connector" field. The name set here can be anything, and rooms will only connect to other rooms with matching connector names. E.g rooms with the Wall connector in the default field will only connect to rooms that also have the Wall connector tag. This can be used to do things like having difficulty based floors in a multi level labyrinth (separating floors by Y level and making the first floor use a "First" connector, second floor "Second," etc). The default connector used in room structures must match the default connector defined in the script block of the maze they're supposed to generate in!
If you want to get even more specific, the menu for specifying exits when exporting rooms also has a "connectors" field to define connections for sides in the room structure. Maze script blocks can also set sides connections for things like its exit points to always force certain rooms to generate as exits. so instead of telling a room to be universally germophobic to other rooms which don't match it, you can tell it to be selectively germophobic. Each exit can have a connector defined separately, giving each exit of a room a different rule set. E.g your North facing exit could be "EntryOne," and your East facing exit could be "EntryTwo." This will force the North facing exit to only connect to the specific face of other rooms which have the EntryOne connector tag, and the East facing exit to only connect to EntryTwo tags (those other rooms can also have mixed tags, allowing you to more or less specify general orientations/ room sequences in your mazes). Be careful going too overboard with this though, as it may result in a dead end maze or even a crash if an invalid combination of connector tags and room shapes makes it impossible to create a path between your maze exits.
The last logic feature of these connection tags is "gendered rules." If you don't know, gendered attachments are a circuitry concept of two objects fitting together because of opposite shapes, more or less. They are given the labels "hermaphrodite, male, and female." An example would be an electrical cable being a "male" connection, and the wall socket being the "female" connection (yes, hur hur, very lewd). Male and female connections will attach to their opposites, but not themselves. Hermaphrodites will connect to anything, and are the default logic state of connection tags (e.g simply specifying two "Wall" tags means they will connect to each other in any combination). You can change to a gendered tag by prefixing your connection tag with "gender:". For example: "Male:Wall" will connect to "Female:Wall" and plain "Wall" tags, but will not connect to another "Male:Wall." An example use of this would be having a labyrinth with a good treasure room that you always want to surround with trapped rooms. You would give every exit on the treasure room something like a "Male:Loot" tag, and one exit on some trap rooms the "Female:Loot" tag. The other exits for those trap rooms could then be the default connector used for the rest of the maze or whatever else you're doing (or even a connector that forced another trap room and then the default rooms, so that you have to go through a long room of traps to get the loot! Pay attention to maze size though as this will create a large X of rooms in your maze).
Here is a diagram to visualize various room connector rules:
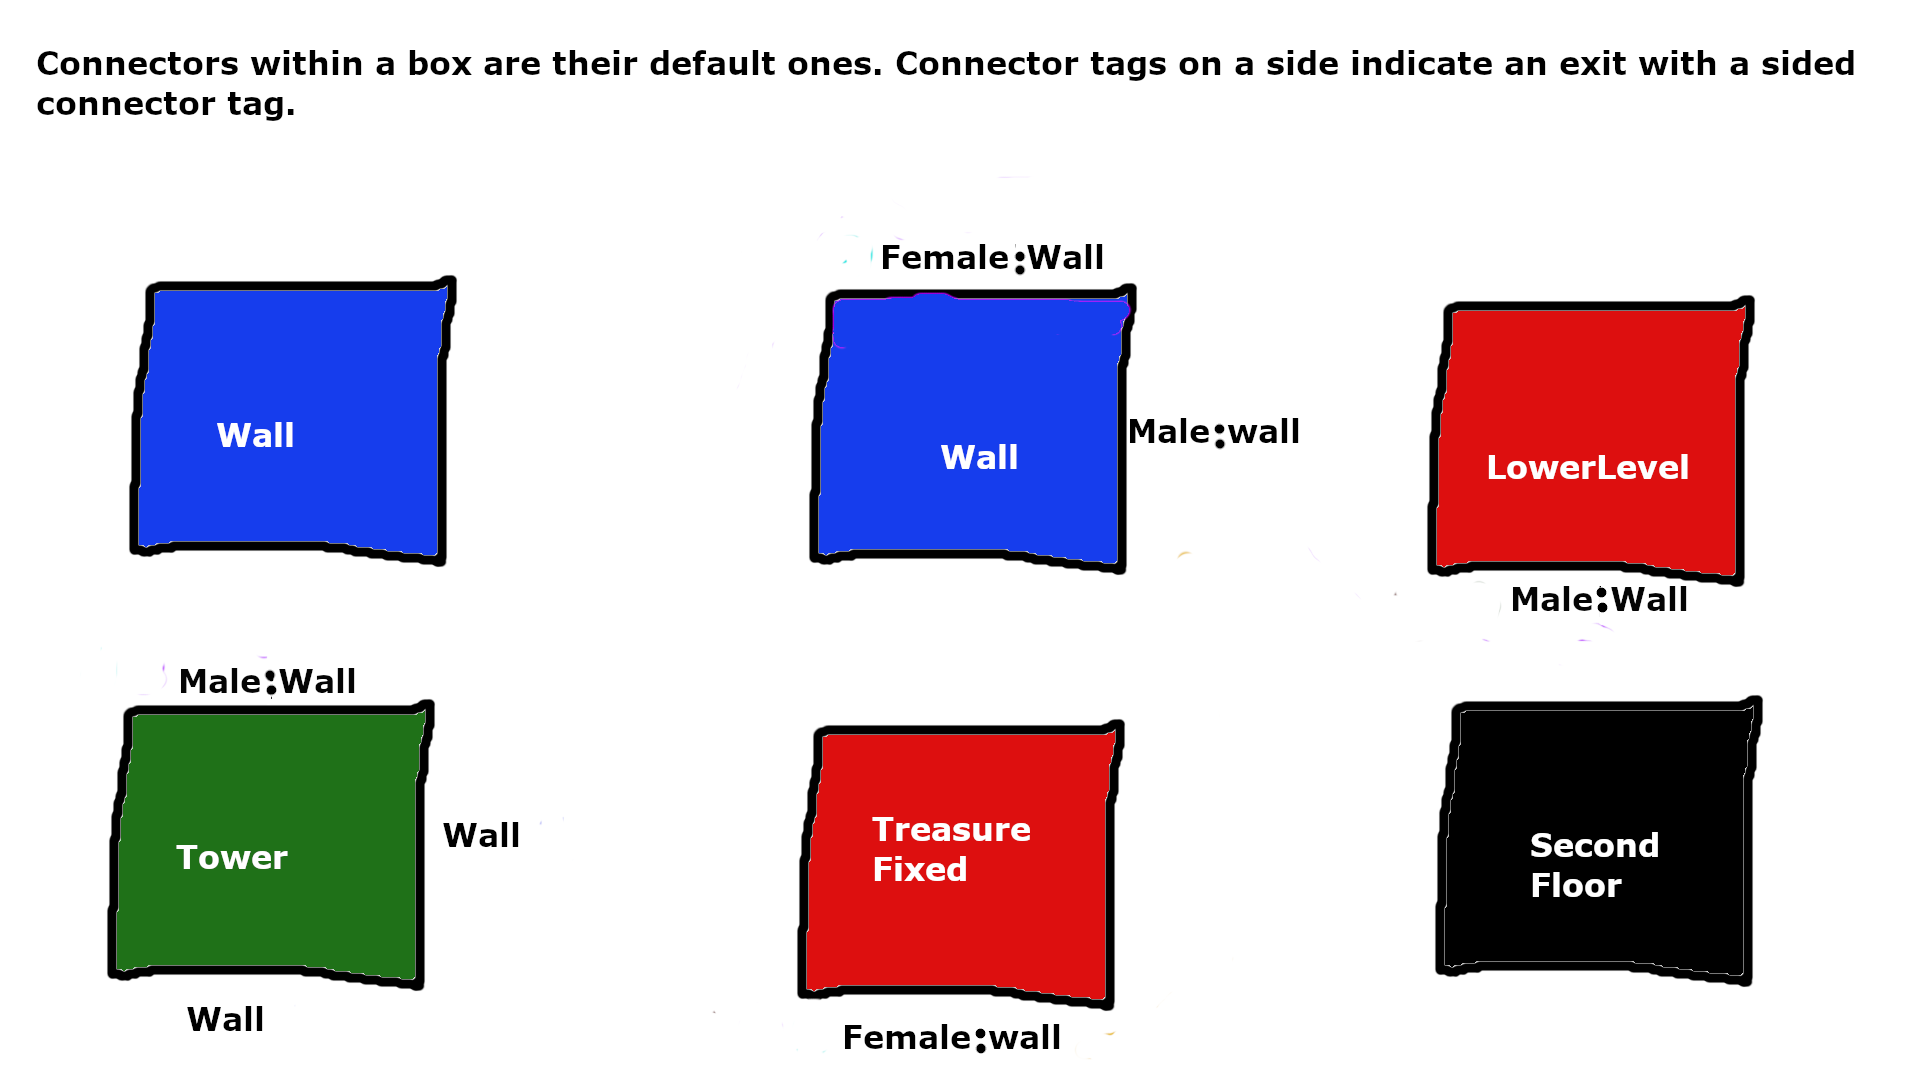
A default connector tag will apply itself to every side of a room unless otherwise specified. You can see that rooms which have hermaphrodite sided connectors (blue) will connect to multiple other gendered rooms and themselves, so long as they have the same connector type "Wall." The black room won't connect to any of the rooms here because its default connector will apply the connection tag to all sides, and that doesn't match up with the default connector of the maze or of the rooms listed here (or any side connectors). To have that room generate, it would need an additional room with one of the exits given a "SecondFloor" connector, and the default connector set to match one of the valid connectors being used. The LowerLevel room will not connect to the TreasureFixed room because those two haven't been set to "rotatable." Meaning that even though their sided connectors are compatible, the exits aren't facing in a way that's compatible, because one would need to rotate 180 degrees to match. It can, however, connect to one of the rooms with a matching side (blue and green. For blue, any side, for green, the sides with "Wall"), which then may connect to the TreasureFixed room.
You might have also noticed all these "conditions" fields in some of the menus for maze components and the script block. They function much like condition rules for regular structures in that they prevent or allow generation based on a set of logic operators. E.g biome specific structures work just like they normally would, allowing you to do things like give a labyrinth or town biome specific rooms.
WIP