Mechanics & Detection
The mod operates during the PRE_LAUNCH and INIT stages of the Minecraft lifecycle. It queries the Java Virtual Machine (JVM) for the -Xmx parameter (Maximum Heap Size).
Memory Thresholds
By default, the mod checks if the allocated memory is at least 2GB (2048MB). However, this is fully adjustable via the configuration file to suit the specific needs of different modpacks.
| Mechanic | Description | Default Value |
|---|---|---|
| Memory Check | Scans JVM arguments for allocated RAM | Active |
| Warning Trigger | Displays UI popup if RAM < Threshold | 2048 MB |
| Completion Alert | Plays sound on ClientReady event |
entity.experience_orb.pickup |
| Window Focus | Brings Minecraft to front after loading | Enabled |
RAM Allocation Guide
Since the Load Support Mod identifies memory issues, it is vital to know how to fix them. Below is an exhaustive guide for allocating more RAM across all major Minecraft launchers.

Minecraft Launcher (Vanilla)
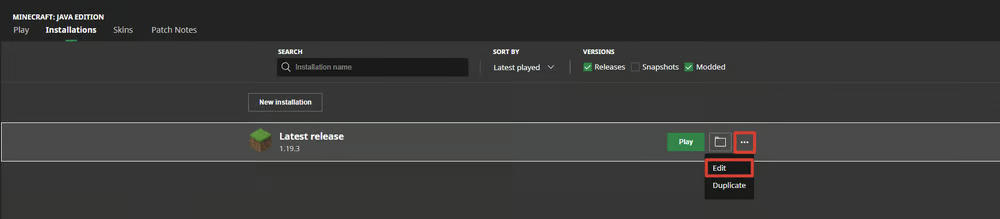
- Open the Launcher and navigate to the Java Edition section.
- Click on the Installations tab.
- Hover over your desired installation, click the three dots (...), and select Edit.
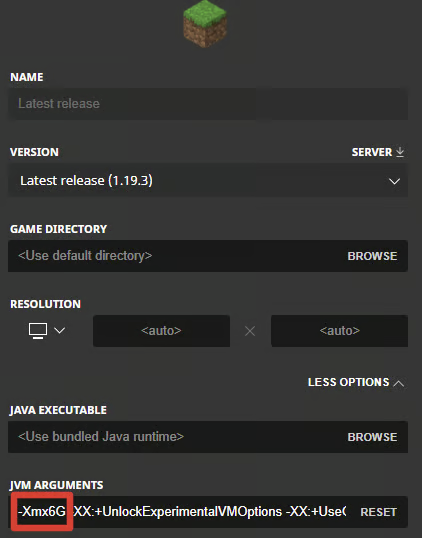
- Click More Options at the bottom.
- Locate the JVM Arguments field. Change the value after
-Xmx. For example, change-Xmx2Gto-Xmx6Gto allocate 6GB of RAM.
Modrinth Launcher
- Select the Settings button (gear icon).
- Under the Java Memory section, use the slider or type the exact amount of RAM needed.
Prism Launcher
- Select your Instance and click Edit on the left sidebar.
- Navigate to the Settings tab on the right.
- Check the Memory box.
- Set both Minimum and Maximum Memory to your desired value.
TLauncher
- Click the Settings button in the bottom right corner.
- Select the Settings text in the popup.
- In the Minecraft Settings tab, adjust the Selection Java slider to the desired RAM amount.
- Click Save.
Lunar Client
- Click the Settings button in the bottom left.
- Under the Game tab, locate the RAM slider and adjust it accordingly.
ATLauncher
- Select the Settings tab on the right.
- Choose the Java/Minecraft tab at the top.
- Change the Maximum Memory/Ram value.
- Click Save at the bottom.
FTB Launcher
- Select the Settings button on the left.
- Go to the Instance Default tab and scroll to Java.
- Drag the slider to your preferred memory allocation.
Feather Launcher
- Select the Settings button in the top right.
- Under Allocated RAM, drag the slider to the desired amount.
Core Features
Load Support Mod focuses on three main pillars of stability and convenience:
- Low Memory Warning: If the mod detects that the allocated Java memory is below the recommended threshold for the current modpack, it triggers a popup. This prevents the game from entering a 'Not Responding' state or crashing with an 'Out of Memory' error later in the loading process.
- Window Blocking: To ensure the player does not miss the memory warning, the mod can block the game window or force focus, making the diagnostic information impossible to ignore.
- Loading Completion Sound: Large modpacks can take several minutes to load. This mod plays a customizable sound effect once the main menu is reached, signaling to the player that the game is ready to play.
World Content (Items, Blocks, Mobs)
As a technical utility mod, Load Support Mod does not add traditional world content such as mobs, items, blocks, or biomes. Its impact is entirely on the system level and the user interface during the loading screen.
- Mobs: None. The mod does not modify entity behavior or spawn rates.
- Items: None. There are no tools or materials added to the creative or survival inventories.
- Blocks: None. No new structures or decorative blocks are included.
- Biomes/Dimensions: None. The mod is compatible with all world-generation mods as it does not interfere with terrain generation.