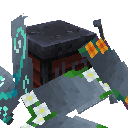
DownloadElytra Trims Mod
Get the files on 9Minecraft
Getting the pieces together
To trim an elytra you need three  things at the smithing table: the elytra itself, a smithing template for the trim pattern you want, and a mineral that matches the trim material (the same materials used for armor trims, such as iron, gold, diamond, netherite, redstone, lapis,
 emerald, quartz, amethyst, or copper). You also need the template item in the template slot — the mod follows the vanilla smithing layout, so the elytra goes in the base slot, the template in the middle, and the mineral in the addition slot.
Doing the trim
1. Place the smithing table and open it.
2. Put your elytra in the leftmost (base) slot.
3. Put the matching smithing template in the template slot.
4. Put the trim mineral in the addition slot.
5. The output slot shows the trimmed elytra — take it out.
The trim is cosmetic only; flight behavior, durability, and enchantments are unchanged. If the output slot stays empty, you are missing one of the three ingredients or the template does not match the mineral you chose. Once applied, the trim is permanent on that elytra, so test the look on a spare pair first if you are unsure.